Sunday, 22 May 2011

Project 1 - Part One


Story

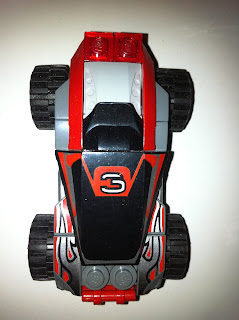
"Vroooooom! ", Rat was just overtaken by 'Speedy' who's driving the red lego race car. Both Speedy and Rat are vying for the top prize and to be crowned the 'Champion Racer' by 'Cody', the toddler in the house and also the master of all the toys. Being crowned Champion Racer by Cody was the most prestigious title of all the titles that Cody has ever given, as Cody love playing with his toy cars very much. Both Rat and Speedy are not going easy on each other in order to attain the title. As Speedy zoomed past Rat, Rat slammed even harder down on the accelerator, as he did not want to miss his one and only chance in attaining the title of Champion Racer and not forgetting the top prize, which was a brand new metal chromed remote controlled car that Cody just bought. Speedy filled with confidence, never once looking back, did a mini drift at the last bend with Rat following close behind. Both Rat and Speedy are now head to head, driving at full speed down the final stretch of the Cheesy Cheese Circuit (CCC), and towards the finishing line. Who will be the Champion Racer? Stay tuned :)


Shapes

My lego toy car model consists of a lot of unique shapes, such as the flag, the engine and the wheels. I say that the shapes of the objects are unique because I will require special tools and techniques to model them in Maya.

For example: The flag I will be using the non-linear bend tool, which we learnt how to use in the race track exercise. In addition, the shapes are unique because it is very difficult to model them out of a single polygon. Many different polygons of different shapes and sizes will be needed to be grouped together in order to form a single component or lego piece of the toy car ( for example: the wheel).

This lego toy car that I will be using for Project 1 was specially constructed by myself with all the concepts and techniques that I have learnt from the past exercises in mind. I wanted to incorporate every tool that I have learnt to construct my model for Project 1. For example: the non-linear bend tool learnt in the race track exercise as mentioned earlier, the boolean > difference tool learnt in the toy blocks exercise, and maybe the revolve and EP curve tool learnt in the bucket exercise. I can use the non-linear bend tool, revolve and EP curve tool for the flags on my toy car and the boolean > difference tool for the holes in the wheels of my toy car.

In conclusion, each lego block used in this red lego toy car of mine was handpicked from my mini collection of lego blocks. This is because, I want to give myself a challenge and try to make use of all the tools that I have learnt in Maya to construct my model for Project 1. Therefore, this toy car has quite a high level of significance and not just any lego toy car that can be bought or found in toy stores.


Design

Back view

Front view

Side view

Top view

Bottom view

Sunday, 15 May 2011

Week 4 Lab 1

Thinking Outside the Traditional Mindset review


·         Does multi-tasking give you a real or false sense of having accomplished something?


I personally feel that multi-tasking has given me a real sense of having accomplished something to a certain extent. When I was reading the articles, I was frequently checking on my facebook profile and texting at the same time. This has resulted in me reading the same sentence over and over again, which consumed a lot of time, as I was unable to find the sentence where I have stopped reading. Although this may seem to have been a waste of time, but I now have a clearer understanding of the articles after reading many times over and over again. Hence, I feel that multi-tasking has its pros and cons, for example, a longer amount of time may be spent on the same task, but it has allowed me to work for longer period of time not feeling bored and tired at all due to the constant change of activities.


·         Is learning 3D and design different from learning programming, or is all learning the same?Why?


In my opinion, learning 3D and design is similar to learning programming to a large extent. For both subjects, both requires a large amount of practice in order to improve. In 3D and design, in order to excel you will just have to draw, sketch or model more. In programming, in order to excel, you just have to code, read the codes written by others and understand try to understand what the codes mean. Learning something all amounts to the amount of practice done, the more learning the faster you learn.

Although learning 3D and design is more art-based, while programming is more technical, both subjects require techniques and methods where you will have to learn in order to accomplish any of the tasks assigned in either of the fields. Therefore, I have come to a conclusion that all learning is the same after analyzing the similarities and differences in learning 3D and design and learning programming.


·         The article states that “Learning is actually a very complex operation for an individual”. Do you agree with this? Do you feel that you approach your learning in the best way – if yes, how, and if no, how can you change your work style?


      I agree with the statement to a certain extent. This is because each and every individual feels that they will learn better in a different manner. Some feel that all other distractions and noise must be kept away from them while learning, while others feel that they can learn better or absorb information faster by listening to certain genres of music at the same time. Although this may seem a false sense of accomplishment as discussed earlier I feel that having confidence that you have learnt something whether false or real plays a major part in learning too. After having the sense of accomplishment that you have completed chapter one, then can you move on to chapter two and continue learning more. Hence, I feel that confidence plays an important part in learning too, regardless whether it is real or false. 

       I feel that I approach my learning in the best way, as I feel very comfortable both learning in school and studying at home, most importantly, no stress is felt. I learn by practice and consulting others. I practice in the lab and at home, for example: I model things that I like during my own free time. When I encounter difficulties in my modeling I will either search for the solutions online or consult my lab tutor during the lab sessions. Hence, I feel that I am approaching my learning in the best possible way, as I feel very comfortable will learning and no stress is felt.


·         What are your thoughts about the last paragraph in the extract?


The last paragraph is very true to a large extent. Even if you can create awesome art pieces in the computer, but you can convey the message behind the pieces of art through traditional communication skills, the message behind the art pieces that you mean to portray may be locked up behind the computer screen for good. Therefore, it is very important to not forsake the traditional communication skills even though how marvelous your art techniques with the computer may be. Without your traditional skills it is very difficult for your talents to be realized, as only you can convey the art that you have drawn the way that you want them to be conveyed.


·         Should your lecturers also focus on your work attitude, or just leave you to sink or swim on your own? Why?


I feel that it is the student's responsibility for his own grades, and the lecturers job is to impart their knowledge to the students regardless of their work attitude. If the students have a negative work attitude, it is the students that will suffer in the end and the lecturers of the students are not accountable for that. Therefore, in my opinion, the lecturers should focus on how to impart their knowledge and skills that they know to the students in the most interactive manner and not to focus on the student's work attitude. It is all up to the student's whether they want to spend their time wisely during their time spent with the lecturers and try their best to extract / absorb this useful knowledge that the lecturers have to offer. In the end of the day, it is the students that suffer or benefit due to their work attitude and not the lecturers.


Week 3 Lab 2 - Wash Board

Step 1 - Create a rectangular polygon using the create polygon cube tool, and select alternate faces of the polygon.

Step 2 - Use the extrude tool to extrude the alternate faces selected.

Step 3 - Use the bevel tool to bevel the protruding faces that have just been extruded.

Step 4 - Create a rectangular polygon and extrude to form the shape high-lighted above.

Step 5 - Extrude the bottom of the wash board to form the base.

Step 6 - Create two rectangular polygon and attach to both sides of the washboard.

Step 7 - Bevel the necessary areas of the wash board manually using the insert edge loop tool to make it as realistic as possible and group all the different parts together.


Reflection

In this exercise, I have learnt how to bevel both manually and automatically using the bevel tool. Just like the card board box and toy train exercise, beveling has helped make the model even more realistic and more appealing. Through this exercise I have learnt to make full use of the extrude tool to construct my model, almost every part of the wash board was achieved by using the extrude tool. I also learnt how to align my polygons using the align tool.

Research


Here are some of the videos that I saw on youtube, which gave me a clearer understanding and helped me along with this exercise.

Aligning polygons - http://www.youtube.com/watch?v=_VVlYKGalgA
                            http://www.youtube.com/watch?v=Duq-yT-nwjQ

Extruding polygons - http://www.youtube.com/watch?v=SGHWh9ON4HA

Week 3 Lab 2 - Race Track

Step 1 - Use the create polygon tool to create the shape of the track

Step 2 - Use the extrude tool to extrude to the desired length.

Step 3 - Use the insert edge loop tool to insert edges at the bottom of both sides and then using the extrude tool, extrude downwards. Extrude outwards once more to get the protruding shape shown above.

Step 4 - Extrude one last time, but this time scale it to get the nice joint to join with other track pieces.

Step 5 - Change the menu to the 'Animation' menu in the main menu bar and then use the non-linear bend tool to bend the race track to form the shape shown above.

Step 6 - To get this S-shape race track, I added another non-linear bend in the other direction, therefore resulting in two bends in different directions.


Reflection

In this exercise, I experienced using the create polygon tool for the first time. I found this particular tool very handy and convenient as the tool allows my to draw the outline of any shape of a polygon that I want and all I need was to extrude to get the polygon. The non-linear bend tool was also new to me and I found it quite difficult to use. The S-shape race track that I was trying to achieve was not a perfect S-shape due to some difficulties in handling the non-linear bend tool. Overall, this exercise has taught me more methods and techniques to aid me in my modeling journey.

Research

Here are some of the videos that I saw on youtube, which gave me a clearer understanding and helped me along with this exercise.


Saturday, 14 May 2011

Week 3 Lab 1 - Bucket


Step 1 - Create the outline of the bucket for revolving. The outline is created with the EP curve tool. 

 Step 2 - Revolve the curve to get the shape of the bucket

Step 3 - Select two of the opposite faces and move them downwards to form the curve shape where the handle will be connected to.

Step 4 - Create the handle with the 3-point arc tool and then extrude to form the handle. Added a little ring polygon to attach the handle to the bucket.


Reflection
In this exercise, I have learnt to use the revolve tool, which is a very convenient tool for making intricate models quickly. I also got to experience playing around with the EP curve tool and the 3-point arc tool to help me form different polygons. At first I experienced some difficulty in using the curve tool and forming models from the curves itself. After trail and error and lots of practice, I finally managed to form polygon shapes out from the curves drawn on the grid. Hence, I guess with practice comes perfection in modeling, and I hope to learn more techniques and methods to aid me in my modeling journey.

Research

Here are some of the videos that I saw on youtube, which gave me a clearer understanding and helped me along with this exercise.

EP curve tool and revolving - http://www.youtube.com/watch?v=0vqrcHB_efU

E-learning Week 2 Lab 2

Step 1 - Create a polygon cube with 9 divisions on each side.

Step 2 - Insert edge loops and select the faces on top.

Step 3 - Delete the selected faces on top.

Step 4 - Use the extrude tool to extrude the remaining faces on top to form the flaps of the box.

Step 5 - Use the move tool to make the flaps point outwards.

Step 6 - Insert edge loops in the necessary locations and then smooth the entire box to make the edges curved / beveled and give a more realistic look.

Step 7 - Select random vertices and rotate them to give the box an aging / used effect.


Reflection
This exercise has thought me how to make my models look more realistic by beveling the edges and rotating certain parts of the model by a bit to give it an aging / used effect. During this exercise, I encountered a major problem, which affected the look of my model. The problem is with the flaps of the box. When do not understand how to set the pivot where the flap bends, hence resulting in the face on top of the flap to slant at an unrealistic manner. Hence, affecting the overall look of the box.

Research

Here are some of the videos that I saw on youtube, which gave me a clearer understanding and helped me along with this exercise.

Insert edge loop and smoothing - http://www.youtube.com/watch?v=FfjuKY1jN6Y

Friday, 13 May 2011

E-Learning Week 2 Gears

Step 1 - I selected alternate faces of the ring polygon provided, leaving a single segment spacing between each of the selected faces.

Step 2 - I used the extrude tool to extrude the selected faces, to form the teeth of the gear.

Step 3 - Still using the extrude tool, I scaled the teeth of each gear to have a pointier end as an additional detail

Step 4 - Changed to object mode and my gear is complete! 


Reflection

I found this exercise quite simple but still helpful at the same time. I taught me how to come up with a variety of designs just by scaling. Take the second and the last model for example, both of the models look like gears but because of the scale tool I was able to model both gears to have different shaped teeth, hence giving me a wider variety of designs. 

Research

Here are some of the videos that I saw on youtube, which gave me a clearer understanding and helped me along with this exercise.

Move, scale and rotate tool - http://www.youtube.com/watch?v=CxGnx1jLxbY

Saturday, 7 May 2011

Practice - T-Rex model

Front view of my not-so-perfect T-Rex model

Side view of my not-so-perfect T-Rex model


Reflection

Finally finished my model of a T-Rex after spending a day on it, experimenting with different tools in Maya. I find the skin of the body very wrinkled though, I guess I added too many subdivisions which caused them to fold in on themselves when I manipulated one of the vertices. This is my second try to model organic creatures, as I find modeling organic models very interesting and I hope to learn more on modeling organic models in the future IN3D classes.

Monday, 2 May 2011

E-learning Week 2 lab 1

End product of Toy models exercise

Process


For this exercise it was pretty straightforward and simple. The basic steps were mainly to create polygons and then bevel them. However, for the bridge, there was an additional step, which was to boolean > difference. To do this boolean > difference, firstly you need to have two polygons, place them in the correct arrangement as shown below

use the boolean > difference tool and... Tada! the bridge polygon is formed!


End product of Toy train exercise

Process

The process for making the toy train, was pretty much the same as the toy models exercise. The only difference was the shaping of the train parts for example: the engine compartment at the front of the train where the edges of the semi-cylinder polygon had to be selected and using the move tool, I pulled the edges back to give the bending inwards effect.

Reflection 

After following the instructions to construct the toy block models, I learnt how to bevel and boolean > difference. This allowed me to complete the toy train model without any problems. The instructions to this exercise were easy to follow and I did not encounter any difficulties with completing my work.


Research

Here are some of the videos that I saw on youtube, which gave me a clearer understanding and helped me along with this exercise.


Boolean > difference tool - http://www.youtube.com/watch?v=xMS1a8J8DeI