Friday 5 August 2011

Project 2 - Part One

Character

Spencer, the robotic arm thinks to himself: Oh man, I got to do the same work everyday, I am getting sick and tired of my work. I want to try the other work that the other robots are doing for a change. Why am I stacking all these boxes for anyway? Its not like we don't have not enough space! I am so angry right now I just want to smash all these boxes right now! Grrrrr.....

Storyboard


The drawing shown above is the storyboard that I have done.

1.) The first drawing depicts Spencer getting his work done as per normal, but something seems peculiar about his working attitude today. It seems exceptionally slow and reluctant.

2.) The second drawing depicts Spencer getting bored of his work and stopping to think to himself. Spencer is looking at the tower of boxes that he have stacked and thinking to himself if it was really worth his time all this while.

3.) The third drawing depicts Spencer suddenly throwing a tantrum and he vents his anger on his work. Spencer smashes the tower of boxes with anger, causing the boxes to fly in different directions.

4.)The fourth drawing depicts Spencer as if regretting his actions, stopping to look around to check if anyone saw his rebellious act. Spencer seems to be regretting his actions before.

5.) The fifth drawing depicts Spencer stricken with guilt, as he stacks the boxes back again.

Self-Critique


I plan to implement the 'Timing' principle into my animation when Spencer smashes the tower of boxes and the boxes will fly in the air and land as if gravity is acting on the boxes. This will help make my animation more realistic and believable. The 'Follow through and overlapping action' principle will also be implemented into my animation. As Spencer lifts up the boxes, it will not be an easy task due to the heavy weight of the boxes. Hence, as Spencer lifts the boxes his body may arc a little and the initial lifting of the box will be a little slower as the box lifts off the ground, to show that Spencer is not used to the heavy weight of the boxes.

Friday 29 July 2011

Week 13 Lab 1 and 2

Exercise 2

Selected Skeleton > Joint Tool and created the the joint and bones of the skeleton as shown in the diagram above.

Parented the pins of the robot arm to the joints. The new hierarchy is shown in the diagram above.

Selected Skeleton > IK Handle Tool and connected the bottom skeleton joint to the top skeleton joint as shown in the diagram above.

The diagram above shows the new hierarchy after the IK handle was created.

Selected Create > Locator Tool to control the robot arm. Moved the locator to the top left of the robot arm.

After freezing transformation of the locator, I gave an annotation to the locator for reference. Select Modify > Freeze Transformations to freeze transformation. Select Create > Annotation to give an annotation to the object.

Selected Constrain > Point tool, and now the IK handle is constrained to my control object which is the locator. 
The rigging is complete and the robot arm is now ready for animation!

I found this Maya tutorial simple and easy to understand. From this exercise I learnt the importance and the convenience of freezing transformations of control objects. Most importantly, I finally learnt how to rig an object to give me a simpler time when animating and also a more realistic animation.

Exercise 4

1)  Apart from their different sizes, it is obvious from Luxo Jr. that the big lamp is “older” and that the small lamp is “younger”.
How is this communicated by the animation? Give at least THREE examples.

Do NOT say because the small lamp is playing with a ball, or that its name is Luxo Jr. – you should be looking at the animation, how the lamps move and emote (emote means to express emotions).

The small lamp looks younger as it seems more playful and full of energy. The playfulness of the small lamp is shown as it moves around in small and quick hops, stopping for a few seconds to rest before continue moving. The small lamp often exits the screen too to chase after the ball, while the big lamp stays at the same spot most of the time, as if it is tired and lazy to move due to old age. At one point the big lamp stops to look at the flattened ball and shakes its head in disappointment, thinking to itself that the small lamp is naive and childish. I feel that that part was animated extremely well as I could feel what the big lamp was thinking as if it had a mind of its own.

2)  Give an example from Luxo Jr of how timing is used for comic effect. Explain how the timing decisions contribute to the humour.

At some parts of the animation, everything stops moving or slows down, giving the audience enough time to interpret and digest what is going on. For example, when the small lamp jumps on the ball and flattens it, as the ball flattens everything seems to happen in slow motion. This is to give enough time for the audience to comprehend what is happening and also give them time for a quick laugh.

3)   When you create a joint chain, these form a hierarchy, with the first joint at the top and the last joint at the bottom. Explain why this is necessary for the joints to work properly.

The order of the joints in the hierarchy is extremely important when rigging an object. If the joints are not properly  parented to one another, when u are moving the object during animation, the animator may not get the results that he/she is looking for.

Sunday 24 July 2011

Week 12 Lab 1 and 2

1)  Do you need to be able to draw well to create good 2D animation? Explain your view.


I personally do not feel that to create good 2D animation, one needs to be able to draw well. Although I must admit that to be able to draw well will definitely be an advantage in my 2D animation, as it will allow me to be able to draw out my concept (storyboard) and give me a better overview on my entire animation. In my opinion, to create good 2D animations, being able to draw well is not the most important factor, the most important factor will be being able to keep in mind the animation principles and implementing them into your own animations. Not only that, but you must also be able to ensure your animation to play smoothly. Only with these skills, will you be a good 2D animator.


2) Do you need to be able to draw well to create good 3D animation? Explain your view.

Once again, I feel that being able to draw well does not play a major role in being able to create good 3D animation. I supposed creating 3D animation is going to be more difficult than creating 2D animations, because there is another perspective/view that the animator will have to put into consideration in order for his/her animations to be realistic and play smoothly. Hence, I feel that being able to draw well will help the animator create good 3D animations to only a certain extent. This skill in drawing well will only aid the animator in a clearer visualization of his overall animation.

3) What do you think would separate a piece of poor animation from a piece of good animation? In other words, how would you go about deciding if a piece of animation is good or bad?

In my opinion, the subject/topic of the piece of animation is not important to me if I am judging if the animation is good or bad. I will see if the content of the animation, if it plays smoothly and if the animation principles are implemented at the necessary parts of the animation. The amount of animation principles does not matter either. It does not mean the more animation principles implemented into the animation, means the piece of animation is good. This is because, sometimes some parts of the animation does not even require animation principles and if the principles are added in at the wrong parts of the animations it will cause the animation to not be able to play smoothly and hence disrupt the quality of the animation. Overall, I can say that the timing of the implementation of the animation principles must be right in order for the animation to be a good one.

4) In 2D animation, you need to be very aware of timing at a frame by frame level, using timing charts and other techniques - but for 3D animation, this is handled using the graph editor, which is more concerned with manipulating rates of change over time. Does this affect how you approach your animation work? Explain.

Personally, I have not tried 2D animation before, and hence I am not very familiar with the techniques and terminologies used. However, I can guess that it will be somewhat similar except that in 3D animation a third attribute will be introduced, for example the translate Z attribute. Therefore, I suppose that it does affect how I approach my animation work to a certain extent.

5) Give a brief critique of Maya as an animation tool. Don't just say Maya makes animation difficult, or easy, or that you need to learn a lot of stuff to use Maya - explain what Maya does well and not so well in terms of creating animation.

I feel that Maya is a very useful animation tool, as this software is equipped with so many tools with its own specific use. Unlike programming, there is no one definite solution to modeling or animating in Maya, this is because there are simply so many tools to choose from. This is what I feel that Maya has done exceptionally well. However, on the other hand, due to this variety of tools at the user's disposal, it will also mean that the user will have to take a long time to learn the purpose and how to use each and every single tool to be able to speak the Maya language fluently.


Week 11 Lab 2

Squash and Stretch Exercise

Created a polygon sphere and grouped it twice, to form the 'translate' group and the 'rotate' group.

Renamed the two groups, switched to the 'Animation  and used the Create Deformer tool > Nonlinear > Squash. I also parented the Translate group to the squash deformer. 

Locked the all the attributes of the Translate class, except for the translate attributes.

Locked the all the attributes of the Rotate class, except for the rotate attributes.

Locked all the attributes of the polygon sphere.

Locked all the attributes of the squash deformer, except for the rotate attributes.

Locked all the attributes of the squash deformer, except for the factor attribute. Although these locking of attributes may seem simple or irrelevant, these steps are actually very crucial if you want to achieve an accurate and realistic animation.

Created a polygon plane and renamed as 'Ground', as it represents the ground that the ball is going to bounce on.

Changed the settings of the time to PAL (25 fps).

Changed the playback speed of the time slider to Real-time (25 fps).

Followed strictly to the table shown above and changed the translate attributes of the translate group of each of the key frames shown above.

The end result looks like this.

After changing the texture and the colour of the ball, I also changed the rotate attributes of the rotate group and the factor attributes of the squash deformer. I also edited the translate Y of the graph editor to give timing to the bounce of the ball.

Here is the end result of the Squash and Stretch Exercise:


In this exercise, I learnt the importance of creating multiple groups and the locking of attributes to achieve a more accurate and realistic animation. I also learnt to implement the 'Squash and Stretch' principle into my animation with the help of the squash deformer. 

Tuesday 19 July 2011

Week 11 Lab 1

Exercise 1

Aligned the ball on the plane and pressed the shortcut 'S' to set a key frame at frame 0.

Aligned the ball on the other side of the plane and pressed the shortcut 'S' to set another key frame at frame 72.

Aligned the ball to be sitting right on top of the fence and pressed the shortcut 'S' to set another key frame at frame 33.

Aligned the ball on the plane at a different position and pressed the shortcut 'S' to set another key frame at frame 50.

Aligned the ball to be slightly of the ground and pressed the shortcut 'S' to set another key frame at frame 60.

Accessed the 'Graph Editor' and viewing the translate Y tangent of the ball.

Did a few minor tweaks here and there to make the ball travel in a more realistic manner.

This tutorial was very straightforward and simple to understand, however I did learn a few things on the topic of animation in maya. For example, I finally understood what the graph editor was for and I also learnt how to  delete static channels to allow maya to process faster. I also found the 'Playblast' tool to be very useful in uploading my animations online.

Here is the result for Exercise 1:


Exercise 2

Aligned the ball to be sitting right at the top and pressed the shortcut 'S' to set a key frame at frame 1.

Aligned the ball to be sitting right at the bottom and pressed the shortcut 'S' to set a key frame at frame 12.

Aligned the ball to be sitting at the top again, but a bit lower this time and pressed the shortcut 'S' to set a key frame at frame 16.

Aligned the ball to be sitting right at the bottom once again and pressed the shortcut 'S' to set a key frame at frame 22.

Aligned the ball to be sitting at the top again, but a bit lower this time and pressed the shortcut 'S' to set a key frame at frame 27.

Aligned the ball to be sitting right at the bottom once again and pressed the shortcut 'S' to set a key frame at frame 33.

Aligned the ball to be sitting at the top again, but a bit lower this time and pressed the shortcut 'S' to set a key frame at frame 36.

Aligned the ball to be sitting right at the bottom once again and pressed the shortcut 'S' to set a key frame at frame 40.

Opened the 'Graph Editor', and selected translate Y.

Used the 'Linear Tool' on the three curves at the bottom. This is to animate the ball to have a sharp drop when it is coming downwards.

Use the 'Break Tangents Tool' on the three curves at the bottom, this is to allow more detailed/specific adjustments to the curves.

Here is the end result of the graph, this is to allow the ball to travel in a more realistic manner.


Here is the result for Exercise 2:


For this exercise, I learnt the importance of the 'Timing Principle' in my animation. When the Timing Principle is considered, it causes the animation to look more realistic, as there seems to be a gravity factor implemented into the animation. Overall, this exercise was pretty simple and easy to understand and I encountered no difficulties in completing this exercise.

Monday 18 July 2011

Week 10 Lab 1


In this video, it is about a girl jumping from a squatting position. The 'Anticipation' principle can be seen as she bends her knees more to get ready for the jump.


This is a similar video to the video above, except in this video the girl is jumping with a bag around her shoulder. The 'Follow through and overlapping action' principle can be seen in this video as when she lands, the bag follows her body's momentum and swings around wildly.


In this third video, it is about a girl running towards the camera. The 'Follow through and overlapping action' principle can be observed in this video too, as she comes to a sudden stop, her long hair sweeps towards the camera due to the momentum.


This is a similar video to the running video above, except in this video the girl is carrying a bag which cannot be seen very clearly as her left hand is blocking the bag from sight. However, if you watch closely, the 'Slow in and slow out' principle can be observed as she slowly accelerates from her run and slowly decelerates at the end to come to a complete stop. 


This video is special, it is about a boy displaying a few of his award-winning robot dance moves. The 'Appeal' principle can obviously be seen in this video, just look at his charisma!


This video is a very basically about a ball bouncing on the spot and slowly coming to a halt. Although we learnt in the lab sessions that the 'Squash and stretch' principle should be able to be seen in a bouncing ball, however in this video the clearest principle that I can spot is the 'Secondary action' principle. The ball is bouncing and rotating at the same time hence, the 'Secondary' principle is observed.


In this video, it is about a ball being passed around between two boys. The 'Arc' principle can easily be spotted as the ball travels in the line of an arc.


This video is very similar to the one directly above it, except in this video there are fakes implemented into the passes. The 'Anticipation' principle can be seen as when the fakes are applied the boy gets ready to catch the ball.


In this video, the passes between the two boys are made by bouncing the ball once on the ground before the other party catches the ball. The 'Timing' principle can be observed in this video and the ball is travelling towards the ground it is accelerating but as it is travelling upwards towards the boy it decelerates due to the laws of physics.


This video is about a girl shouting out vulgarities (censored) before punching the poor boy in thee face. The 'Exaggeration' principle can be seen very clearly in this video as the boy flies through the air and falls to the ground after getting hit by the weak and harmless punch of the girl. 


In this final video, it is about a boy trying to stealthily steal a bottle of white pepper on the floor. However, he still got filmed despite his stealthy efforts. The 'Staging' principle is extremely obvious in this video as the camera films the bottle of pepper first, leaving the audience to want to find out what is going to happen next.

Exercise 3


Squash and stretch
At the beginning of the video, when the man is sitting on the white ball and bouncing up and down, the 'squash and stretch' principle can be seen applied to the ball.

Timing
At the beginning of the video, when the man is sitting on the white ball and bouncing up and down, the 'timing' principle can be seen. When the ball is travelling upwards it decelerates and as the ball is nearer to the ground it accelerates.

Staging
At the beginning of the video, the 'staging' principle can be seen very clearly as the camera shoots the drumsticks that the man is holding and slowly pans down to shoot the big white ball directly below the drumsticks. This is to direct the attention of the audience to the white balls and to inform to the audience that the balls are going to create sound.

Anticipation
At the beginning of the video, when no sound is heard and the man just stares and smiles at the camera. This causes the audience to anticipate what is going to happen next.

Secondary action
At the middle part of the video, secondary action can be seen as the man blinks while waving the white ball in the air.

Arcs
The throwing of the balls seems to be travelling in the line shaped like an arc.

Wednesday 8 June 2011

Project 1 - Part Two


Research


Part one of the video
The link below is a video tutorial on how to model basic tire tracks in maya. In the video, he creates a polygon plane and slowly adjust (move and scale vertices) the plane to form one piece of the tire track. I found this video very useful as the tire tracks on my model is quite complicated too and I need to find more information on how to properly model the tire tracks of a car.


Part two of the video
In the next part of his video, he selects the faces that he wants to extrude on the polygon plane and extrudes the tire tracks from that polygon plane. Next, he moves on to modeling the edges of the polygon plane, as he intends to smooth it afterwards.


Part three of the video
In the third part of his video, he uses the duplicate special tool and duplicates 50 pieces of that polygon plane. Next, he merges all the pieces together and bends the the polygon to form a structure that looks like a pipe/loop. When he bends the 50 polygon pieces to form a loop, there will be a gap caused by the ends of the polygon when bent. He solved this problem by changing the curvature values of the bend, right down to three decimal places. I found this particular technique extremely useful when it comes to joining the ends of a polygon/polygons together, as it helps to achieve the look that the polygon is one whole piece by itself.


I found these three video tutorials very useful. Although it shows us how to model a single object, I learnt many techniques from the video tutorials. Techniques such as using the duplicate special and the bend deformer tool. Although the usage of these tools have been thought to us in the lab sessions in school through online tutorials and under the teacher's guidance, the way the person in the video demonstrates the tools allowed me to learn more on how to use these tools. For example: after using the bend deformer tool, I never knew how to get rid of the bend deformer (ugly line that cuts through my polygon after bending to the desired position). In the end, I found out from the video that simply deleting history in maya solves the problem.

Self-Critique


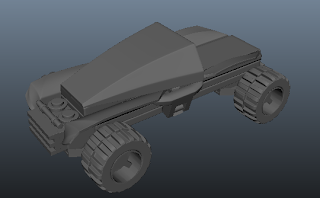
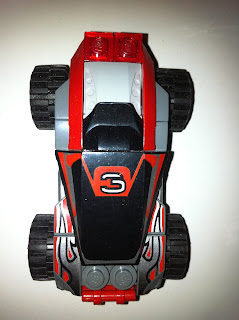
I feel that my final model is very similar to my real object and I would give it a 85% in terms of similarity. The object that I am modeling is a lego toy car and the approach that I took to model my car is by modeling the lego pieces one by one and then putting them together afterwards. Although I have heard that this is the wrong approach to take in modeling and the 'correct' way to model is by extruding from a single polygon, I feel that if I can accurately join the pieces together to make it seem like it my model is extruded from a single polygon. I don't see why this approach is 'wrong'. In my opinion, there are many ways in doing things and the same goes for modeling. I model the way that I am most comfortable in and I am proud of my final model.

I tried using reference images when modeling but I found taking good reference images to be a very difficult task, much less following the reference images. Another confession that I have to make is that I did not add in a few minor details such as the circular indentations in the back engine and the circular holes at the bottom of my lego toy car.

Final


My final model looks slightly thinner than the real model.


Progress


Part One

Part Two

Part Three

Part Four

Part Five


I spent nearly 2 hours a day to do each part of the model shown above. Hence a total of 5 days was spent to complete model.

Sunday 22 May 2011

Project 1 - Part One


Story

"Vroooooom! ", Rat was just overtaken by 'Speedy' who's driving the red lego race car. Both Speedy and Rat are vying for the top prize and to be crowned the 'Champion Racer' by 'Cody', the toddler in the house and also the master of all the toys. Being crowned Champion Racer by Cody was the most prestigious title of all the titles that Cody has ever given, as Cody love playing with his toy cars very much. Both Rat and Speedy are not going easy on each other in order to attain the title. As Speedy zoomed past Rat, Rat slammed even harder down on the accelerator, as he did not want to miss his one and only chance in attaining the title of Champion Racer and not forgetting the top prize, which was a brand new metal chromed remote controlled car that Cody just bought. Speedy filled with confidence, never once looking back, did a mini drift at the last bend with Rat following close behind. Both Rat and Speedy are now head to head, driving at full speed down the final stretch of the Cheesy Cheese Circuit (CCC), and towards the finishing line. Who will be the Champion Racer? Stay tuned :)


Shapes

My lego toy car model consists of a lot of unique shapes, such as the flag, the engine and the wheels. I say that the shapes of the objects are unique because I will require special tools and techniques to model them in Maya.

For example: The flag I will be using the non-linear bend tool, which we learnt how to use in the race track exercise. In addition, the shapes are unique because it is very difficult to model them out of a single polygon. Many different polygons of different shapes and sizes will be needed to be grouped together in order to form a single component or lego piece of the toy car ( for example: the wheel).

This lego toy car that I will be using for Project 1 was specially constructed by myself with all the concepts and techniques that I have learnt from the past exercises in mind. I wanted to incorporate every tool that I have learnt to construct my model for Project 1. For example: the non-linear bend tool learnt in the race track exercise as mentioned earlier, the boolean > difference tool learnt in the toy blocks exercise, and maybe the revolve and EP curve tool learnt in the bucket exercise. I can use the non-linear bend tool, revolve and EP curve tool for the flags on my toy car and the boolean > difference tool for the holes in the wheels of my toy car.

In conclusion, each lego block used in this red lego toy car of mine was handpicked from my mini collection of lego blocks. This is because, I want to give myself a challenge and try to make use of all the tools that I have learnt in Maya to construct my model for Project 1. Therefore, this toy car has quite a high level of significance and not just any lego toy car that can be bought or found in toy stores.


Design

Back view

Front view

Side view

Top view

Bottom view